
In this tutorial, I’m going to show you how to use WordPress, gravity forms, stripe, and a bit of php to create a way to sell gift cards with gravity forms
1. But why?
There are dozens of gift card or gift certificate plugins available for WordPress. It’s probably easier to just use one of them if you are a beginner.
So why use Gravity Forms instead? I did for two reasons:
- I like to minimize the number of plugins I have on any given site for speed and security. And the particular site that I was creating already had Gravity Forms installed, and the stripe add-on setup
- The client was more familiar with Google docs than the WordPress backend, so I wanted to populate gift card codes to a Google sheet, which I knew I could do through Gravity forms and Zapier. A lot of the existing plugins require you to manage the gift card codes from the WP dashboard.
2. Setting up the gravity form
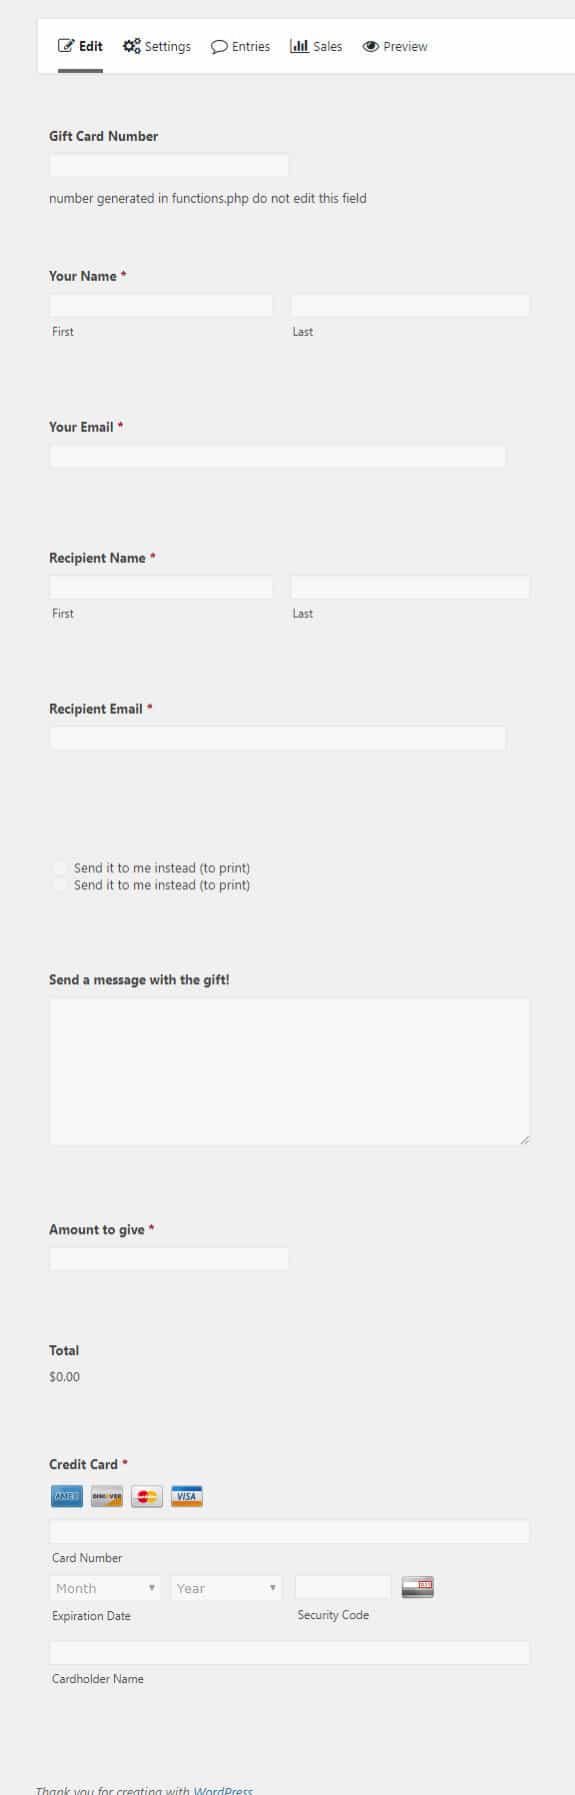
Create a gravity form, with all the relevant fields. You can see the ones I created below.
Note: In order to add a credit card field, you’ll need the stripe add-on for gravity forms. If you don’t know how to set that up, check out this quick video:
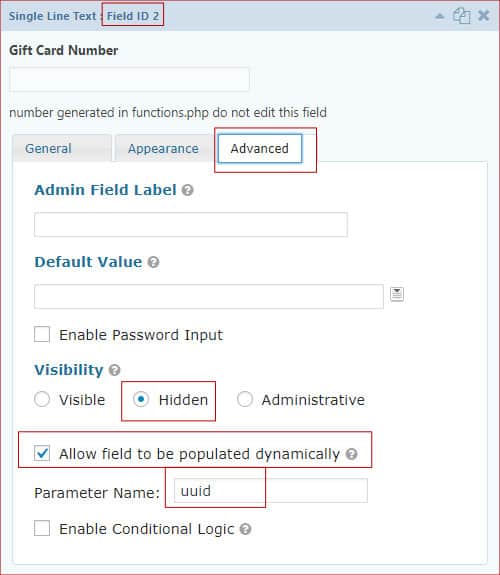
Part of the secret sauce is to make the gift card both hidden and able to be dynamically populated. We don’t want the field to be visible to the user when they fill out the form so we make it hidden. And we want to pragmatically populate the field with a unique gift card code, so we make the field able to be populated dynamically, and add a parameter name.
Save your form and add it to a page. You should have something like what’s below. In this case, I used BeaverBuilder and PowerPack to style it to match the website

3. Add some PHP
We need to add some code to generate a gift card code. I used a snippet from this tutorial on how to generate a unique value with every submission. Add this code to the functions.php file of your child theme:
//Gravity Forms Gift Card Number Generator
add_filter("gform_field_value_uuid", "get_unique");
function get_unique(){
    $prefix = "THG"; // update the prefix to anything here
    do {
        $unique = mt_rand();
        $unique = substr($unique, 0, 8);
        $unique = $prefix . $unique;
    } while (!check_unique($unique));
    return $unique;
}
function check_unique($unique) {
    global $wpdb;
    $table = $wpdb->prefix . 'rg_lead_detail';
    $form_id = 2; // update to the form ID your unique id field belongs to
    $field_id = 2; // update to the field ID your unique id is being prepopulated in
    $result = $wpdb->get_var("SELECT value FROM $table WHERE form_id = '$form_id' AND field_number = '$field_id' AND value = '$unique'");
    if(empty($result))
        return true;
    return false;
}
Be sure to update $form_id and $field_id to match your form and field ID’s respectively. The form ID is listed on the ‘edit form’ page at the top in orange. the field id is shown on the field. I highlight it in a red box in the above image. You can also change the prefix to whatever you want. notice the hook we use: gform_field_value_uuid the uuid bit MUST match the dynamically populated parameter we filled in earlier or this won’t work.
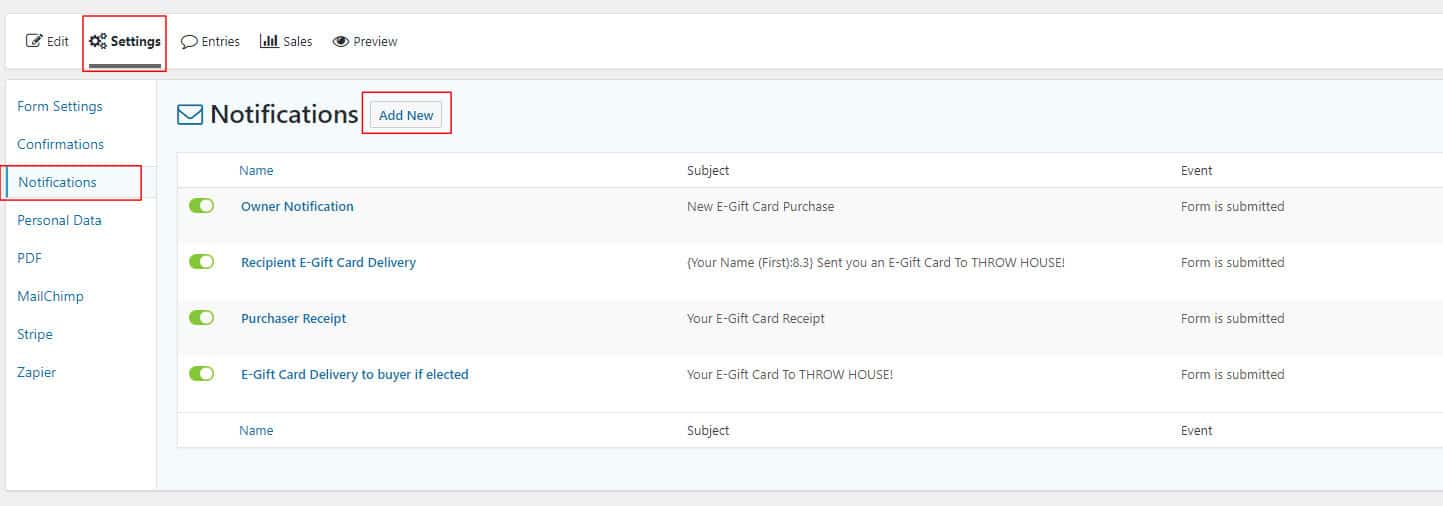
4. Set up the notifications
This is pretty standard functionality for gravity forms. It’s just a notification email sent to an email showing the field values of the submission. In my case I created multiple. One sent to the owner as a notification, one sent to the buyer as a receipt, and one sent to the recipient as the actual gift card.
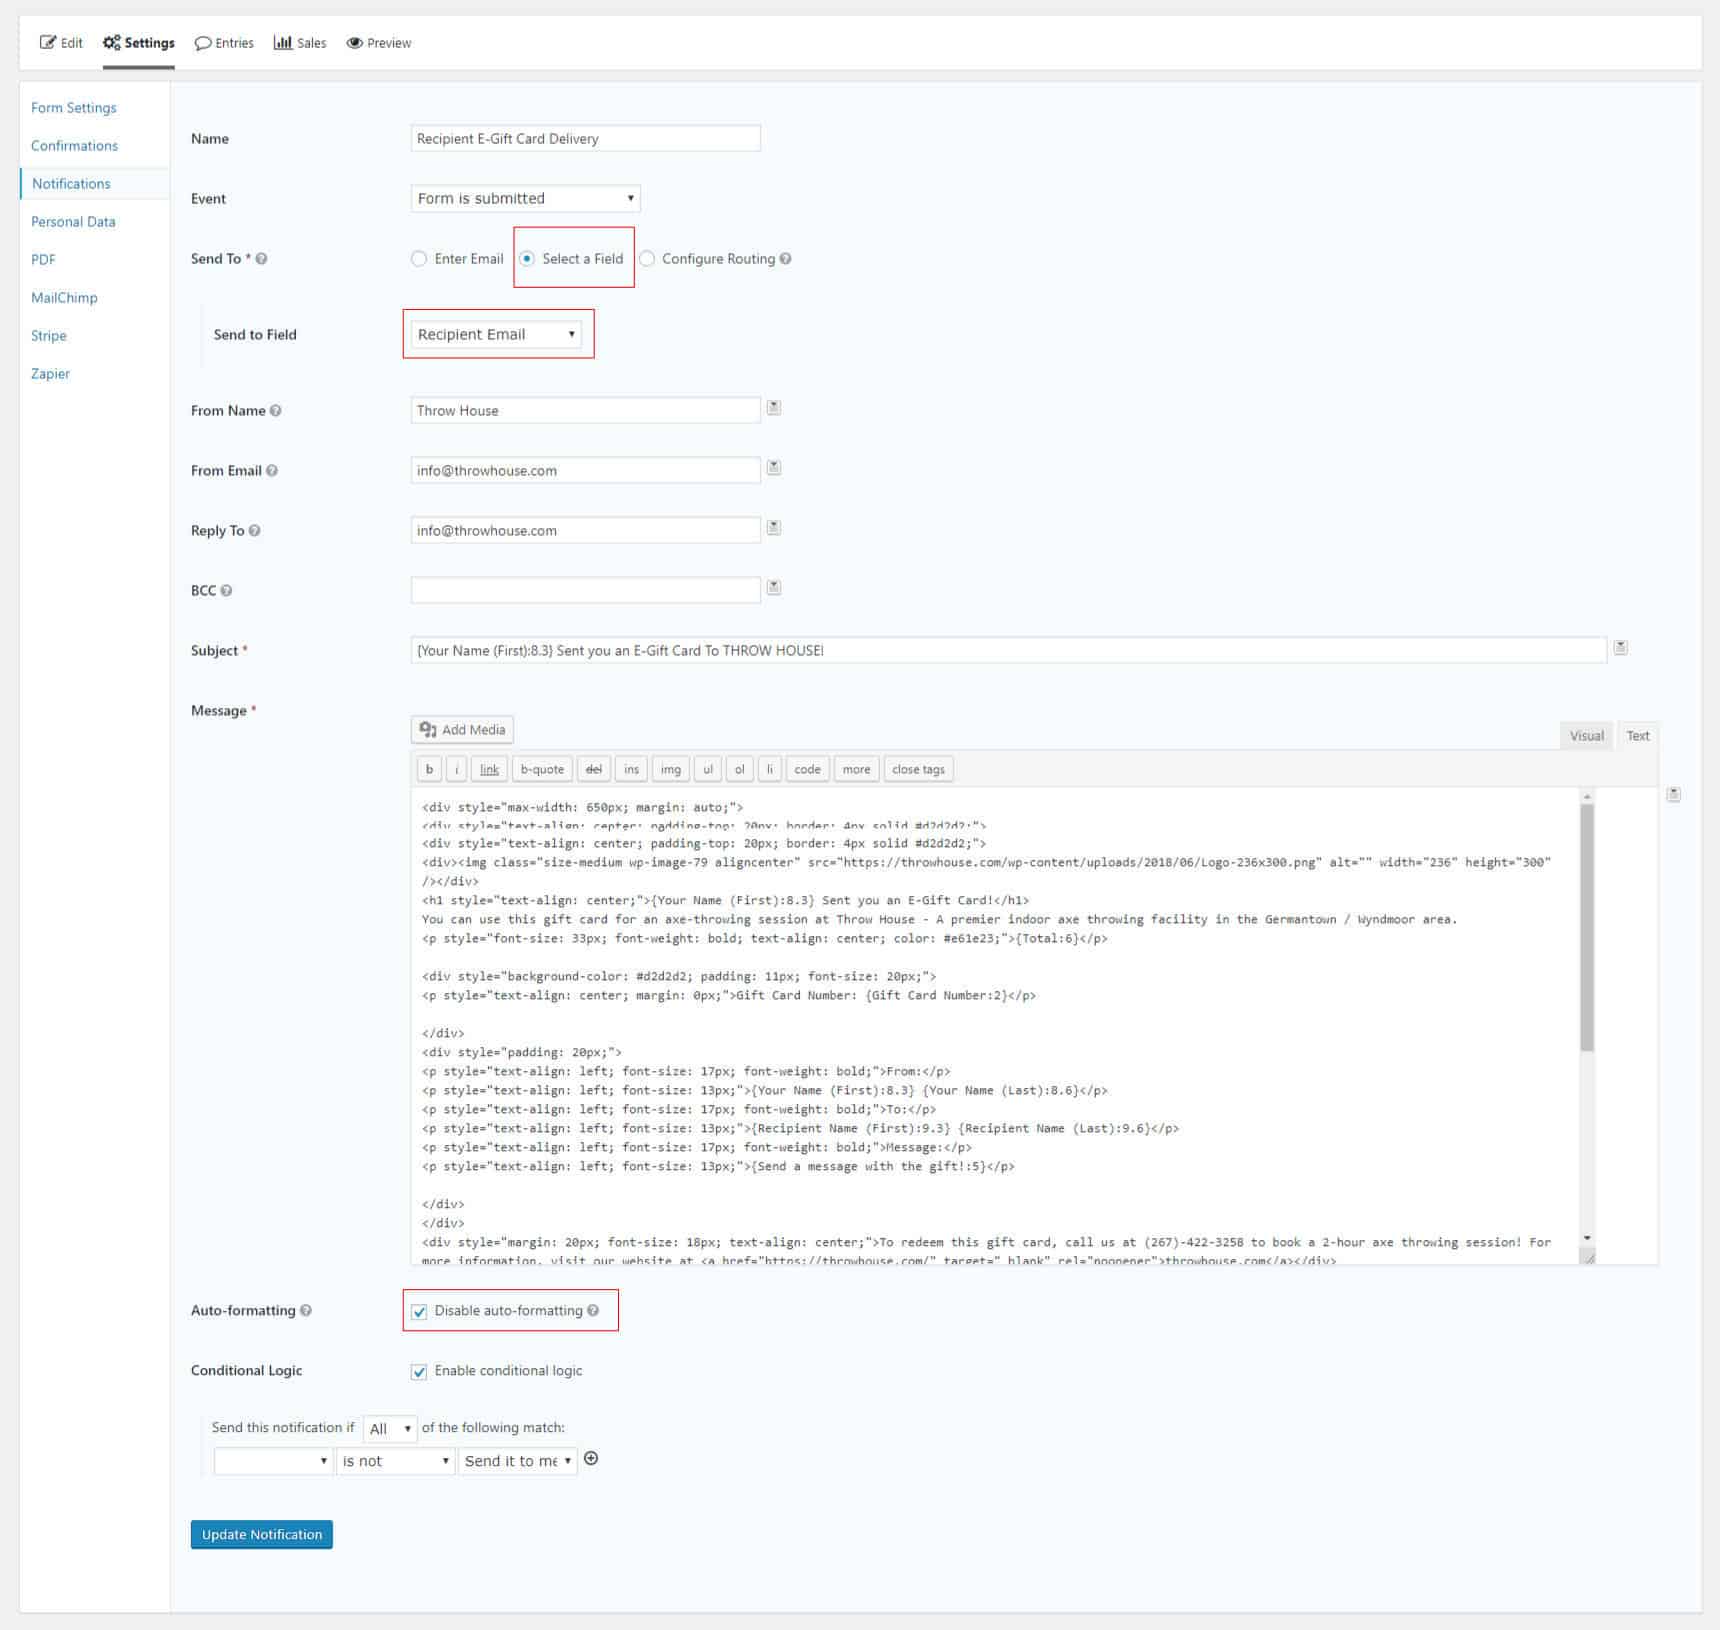
You could use the default {all values} to show the all the form values in formatted in a table in every email, but I wanted to make the email a little bit more visually appealing, so I created this:
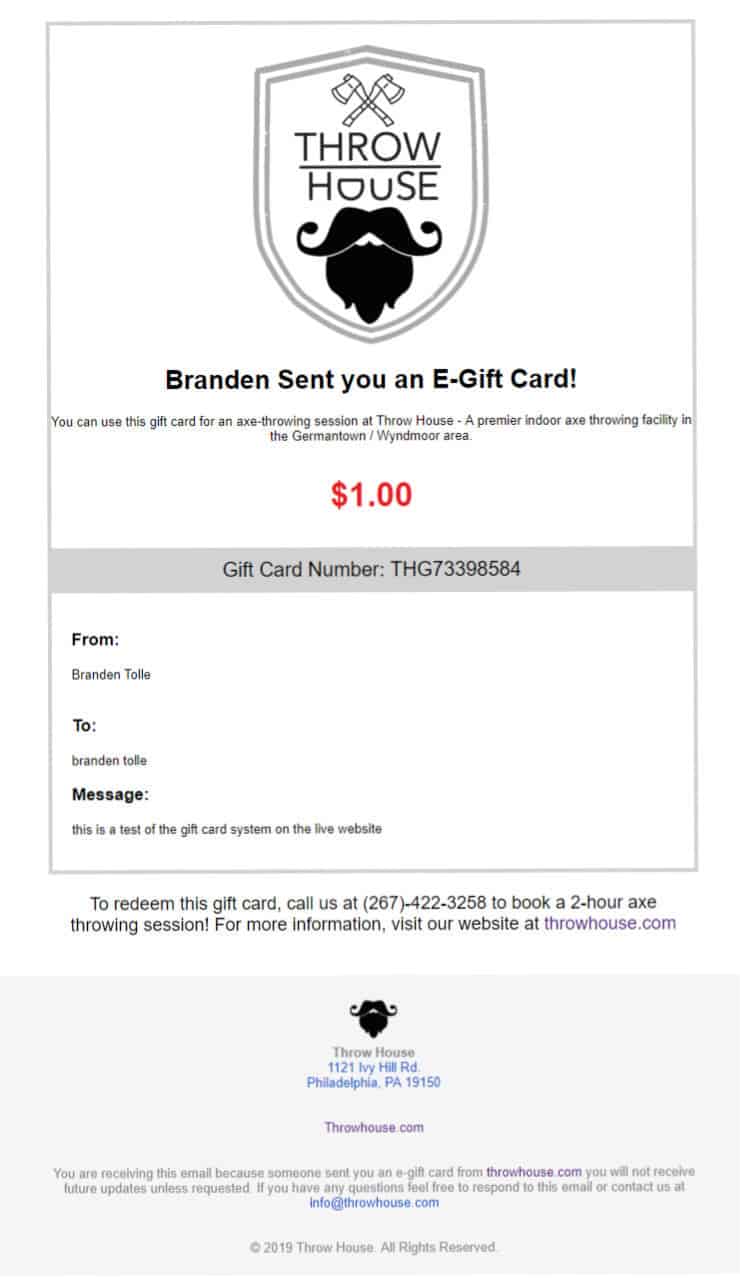
I created that in HTML, if you want to try to copy the code and edit it to make it your own, It’s below. Be sure to swap out all the URLS gravity forms merge tags. The tags won’t work for you unless your field ID’s happen to match.
Note: if you go this route, be sure to check the box ‘disable auto-formatting’
<div style="max-width: 650px; margin: auto;">
<div style="text-align: center; padding-top: 20px; border: 4px solid #d2d2d2;">
<div><img class="size-medium wp-image-79 aligncenter" src="https://yourwebsite.com/wp-content/uploads/2018/06/Logo-236x300.png" alt="" width="236" height="300" /></div>
<h1 style="text-align: center;">{Your Name (First):8.3} Sent you an E-Gift Card!</h1>
You can use this gift card for an axe-throwing session at Throw House - A premier indoor axe throwing facility in the Germantown / Wyndmoor area.
<p style="font-size: 33px; font-weight: bold; text-align: center; color: #e61e23;">{Total:6}</p>

<div style="background-color: #d2d2d2; padding: 11px; font-size: 20px;">
<p style="text-align: center; margin: 0px;">Gift Card Number: {Gift Card Number:2}</p>

</div>
<div style="padding: 20px;">
<p style="text-align: left; font-size: 17px; font-weight: bold;">From:</p>
<p style="text-align: left; font-size: 13px;">{Your Name (First):8.3} {Your Name (Last):8.6}</p>
<p style="text-align: left; font-size: 17px; font-weight: bold;">To:</p>
<p style="text-align: left; font-size: 13px;">{Recipient Name (First):9.3} {Recipient Name (Last):9.6}</p>
<p style="text-align: left; font-size: 17px; font-weight: bold;">Message:</p>
<p style="text-align: left; font-size: 13px;">{Send a message with the gift!:5}</p>

</div>
</div>
<div style="margin: 20px; font-size: 18px; text-align: center;">To redeem this gift card, call us at (267)-422-3258 to book a 2-hour axe throwing session! For more information, visit our website at <a href="https://yourwebsite.com/" target="_blank" rel="noopener">yourwebsite.com</a></div>
</div>
<div style="text-align: center; background-color: #f5f5f5; padding: 20px; margin-top: 40px;">
<div style="max-width: 650px; margin: auto;">
<div><img class="alignnone wp-image-183 " src="https://yourwebsite.com/wp-content/uploads/2019/01/icon-150x150.png" alt="" width="47" height="47" /></div>
<div><strong>Throw House</strong></div>
<div><a href="https://goo.gl/maps/G8eQ4V96bY22">1121 Ivy Hill Rd.</a></div>
<div><a href="https://goo.gl/maps/G8eQ4V96bY22">Philadelphia, PA 19150</a></div>
<div style="margin-top: 30px;">

<a href="http://yourwebsite.com">yourwebsite.com</a>
<div>
<div style="margin-top: 30px;">You are receiving this email because someone sent you an e-gift card from yourwebsite.com you will not receive future updates unless requested. If you have any questions feel free to respond to this email or contact us at [email protected]</div>
<div style="margin-top: 30px;">© 2019 Throw House. All Rights Reserved.</div>
</div>
</div>
</div>
</div>
In my case, I also used conditional logic for the recipient email. If the box ‘Send it to me instead (to print)‘ is checked then the recipient email field disappears, and the recipient email is sent to the purchaser. But I won’t cover that here. You can see the setting in the above notification email set-up screenshot.
5. Email Deliverability
Email deliverability is sort of a complicated topic, and I won’t cover it here, but suffice to say that you should take some precautions if you want to reduce the likelihood of your emails not working or being sent to spam.
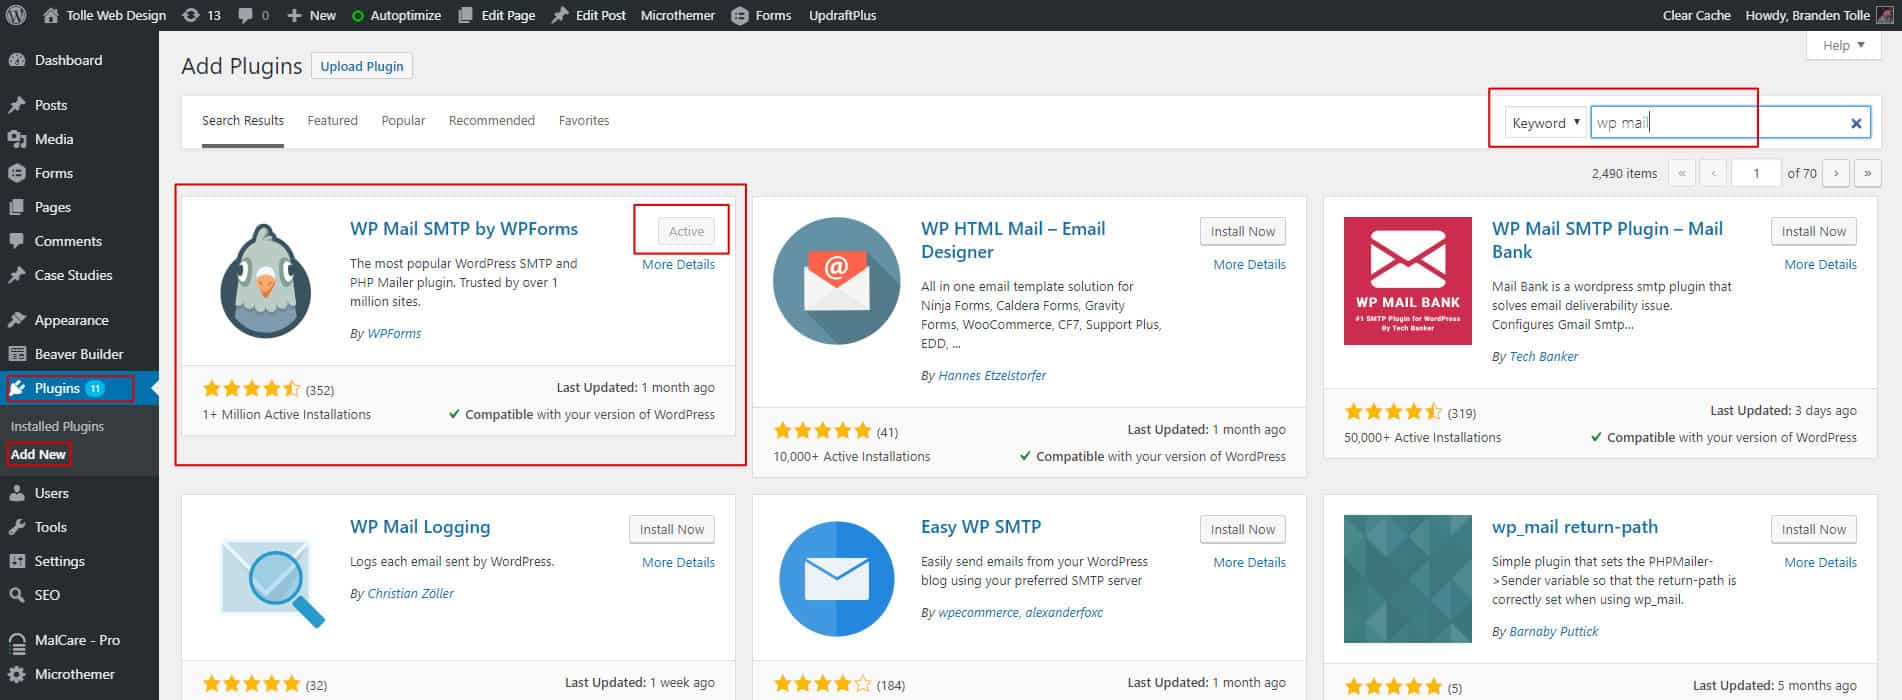
First, install and set up the WP Mail SMTP plugin. If this gift card system is really the only customer facing email your website sends I recommend setting it up with SMTP through Gmail or gsuite. Follow their documentation. Sendgrid and mailgun usually work just fine too though.
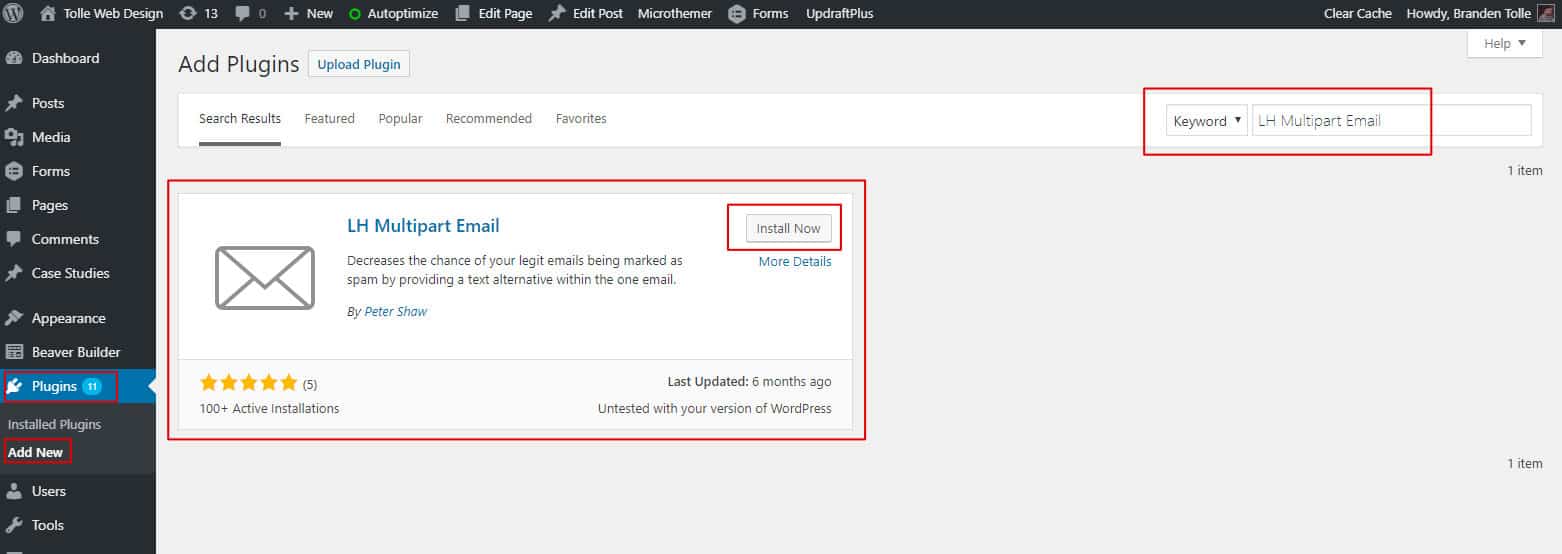
Second, to make your email deliverability even better we are going to use the LH Multipart Email plugin. This plugin automatically serves up a plain text version of your email to email clients that don’t render HTML. Which is basically no one at this point, but it still affects your deliverability.
6. Connect to Zapier
You’ll need the zapier add-on for gravity forms, once you have that activated, go create a free zapier account if you don’t have one
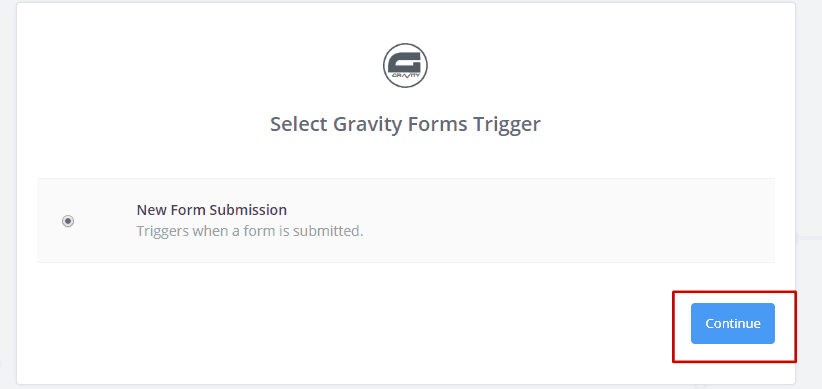
You’ll need to create a new zap to pull the data from the Gravity Forms submission. The first setep will be a gravity forms action.
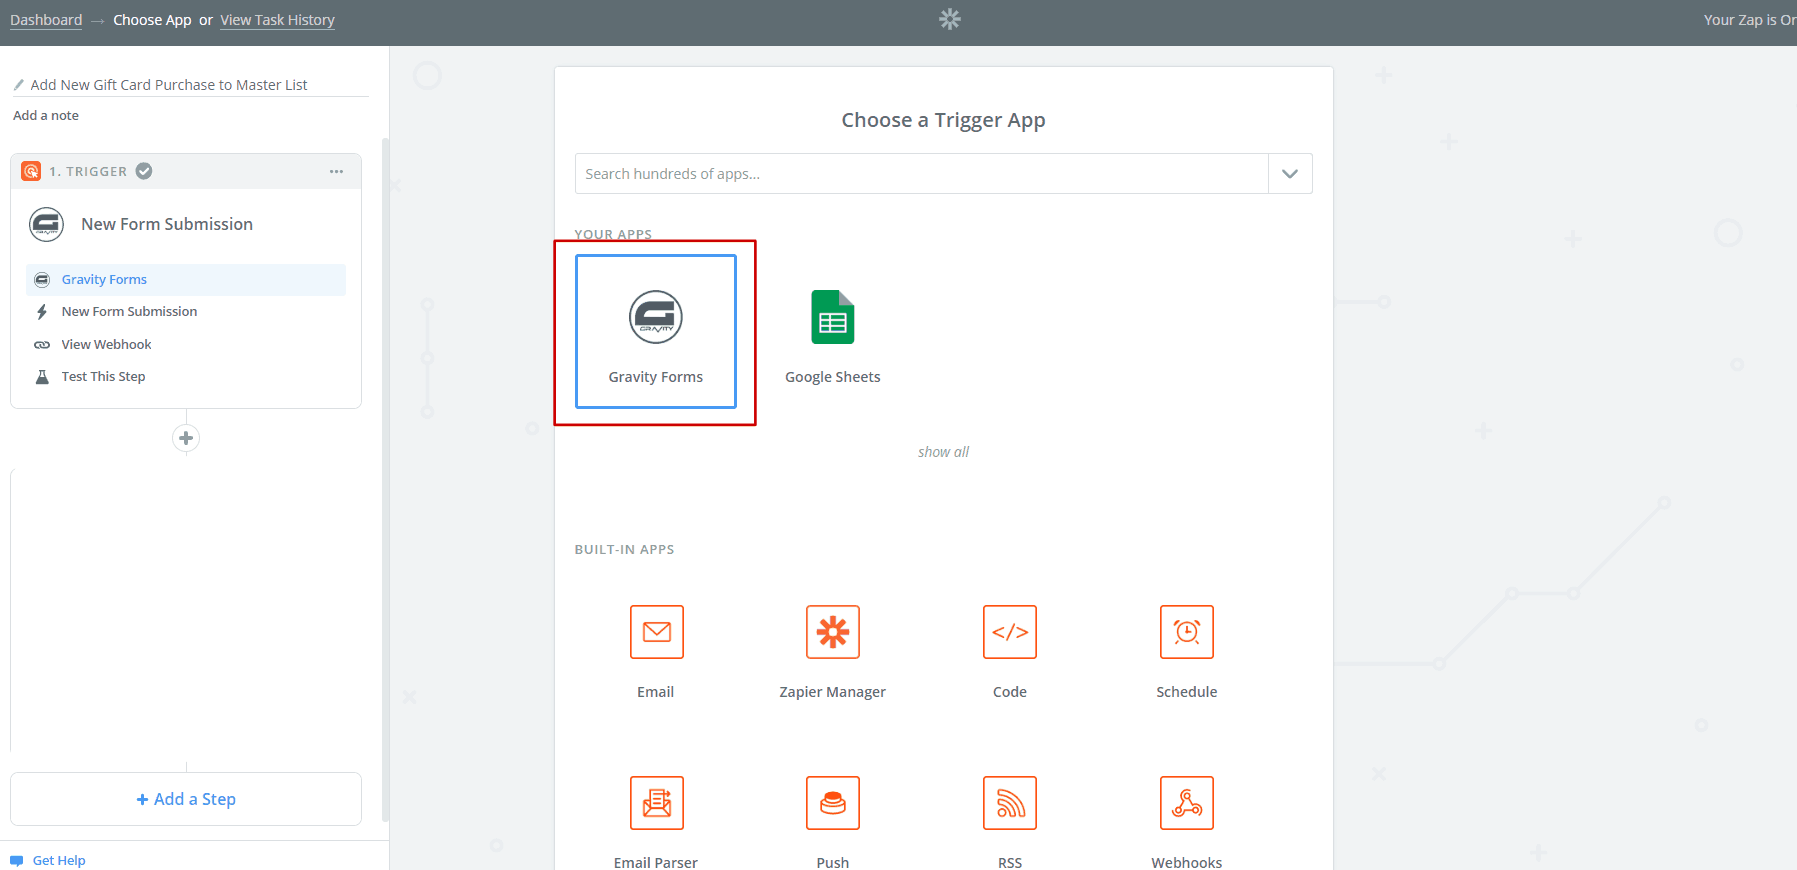
We want this zap to fire when a new form is submitted, so click continue
copy the provided web hook
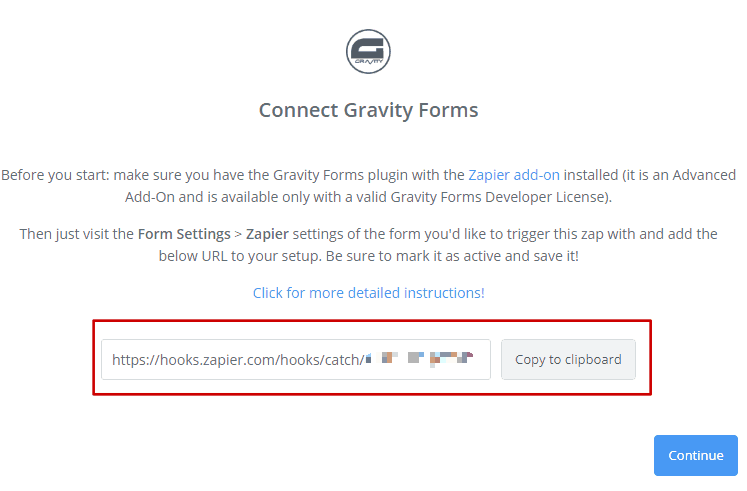
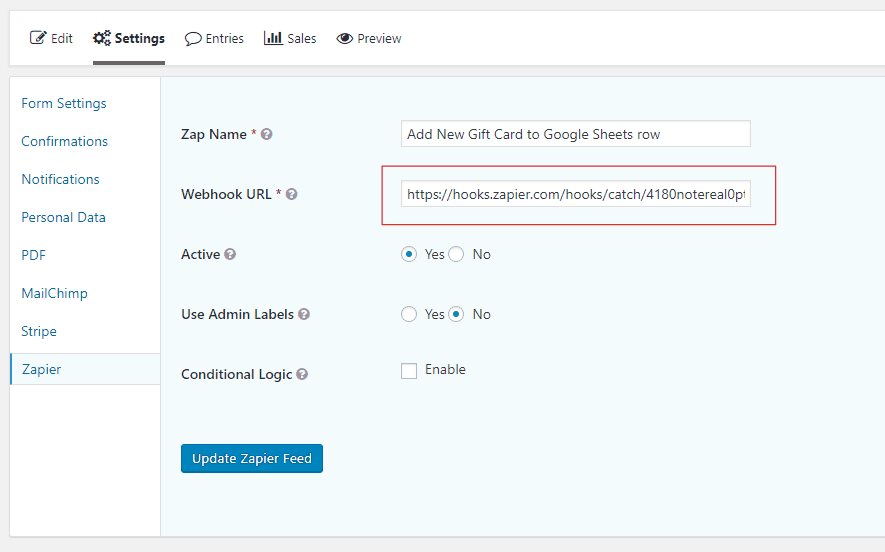
Go back to editing your gravity form in your WP dashboard, and create a new Zapier feed:

add the copied webhook from zapier here, give it a name, and hit save
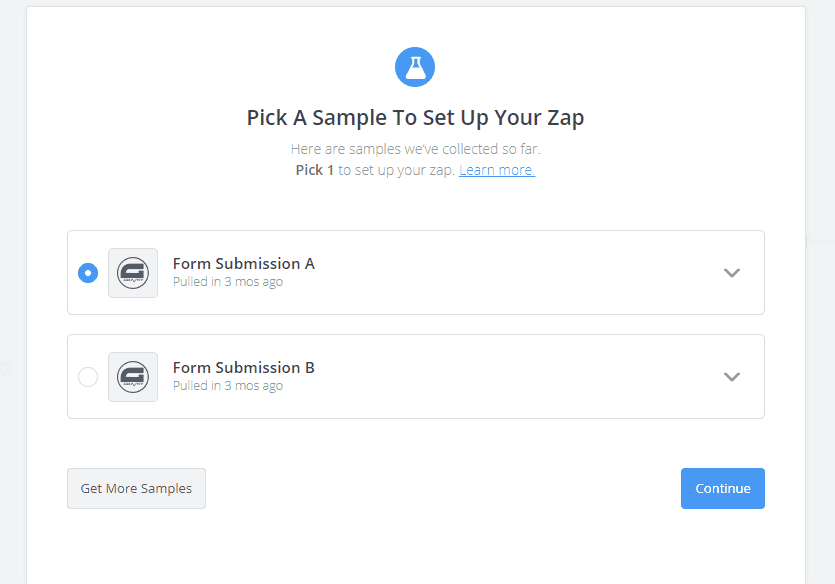
Now whenever a form is submitted, the data will be sent to this zap. Save this, and go back to zapier and hit continue. click test this step and start collecting more samples. Then go back to your website and submit the form as a test. The data you submit should shortly show up in zapier.
Next we need to add a google sheets action. You’ll need to connect you google account to make the magic happen.
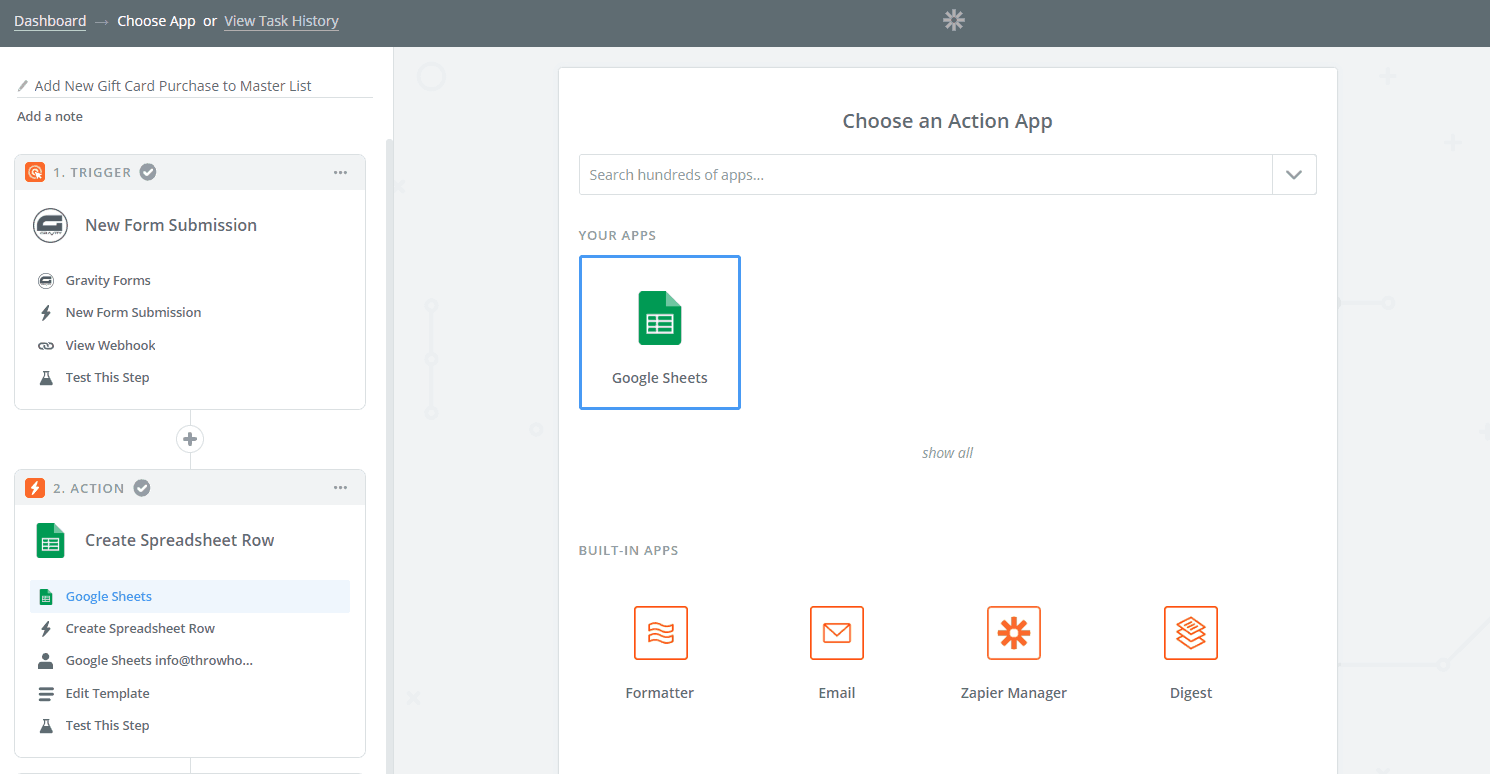
We want this zap to create a new row in a spreadsheet
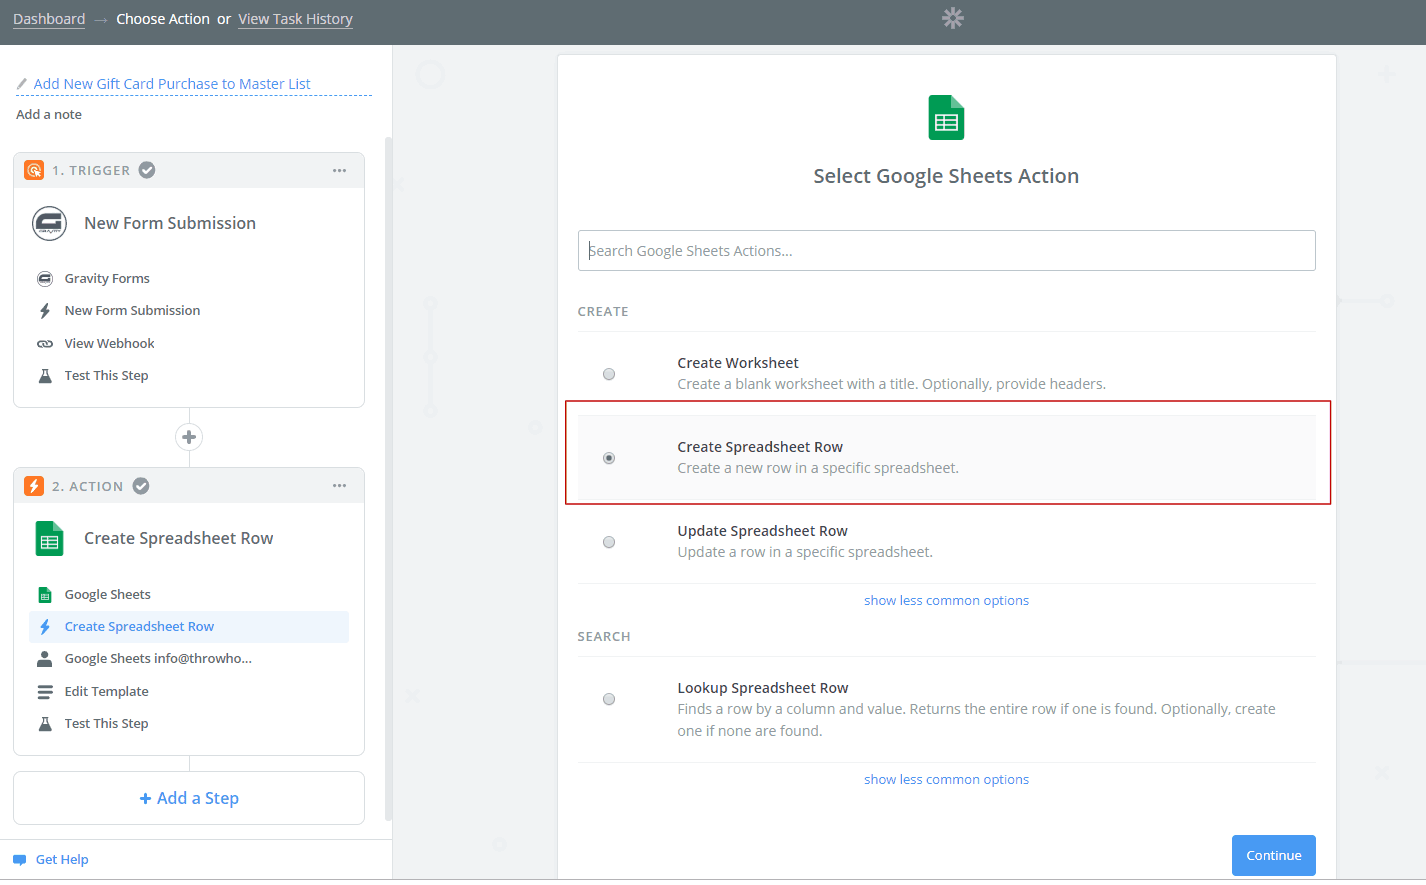
Connect your Google account, and move to ‘edit template’.
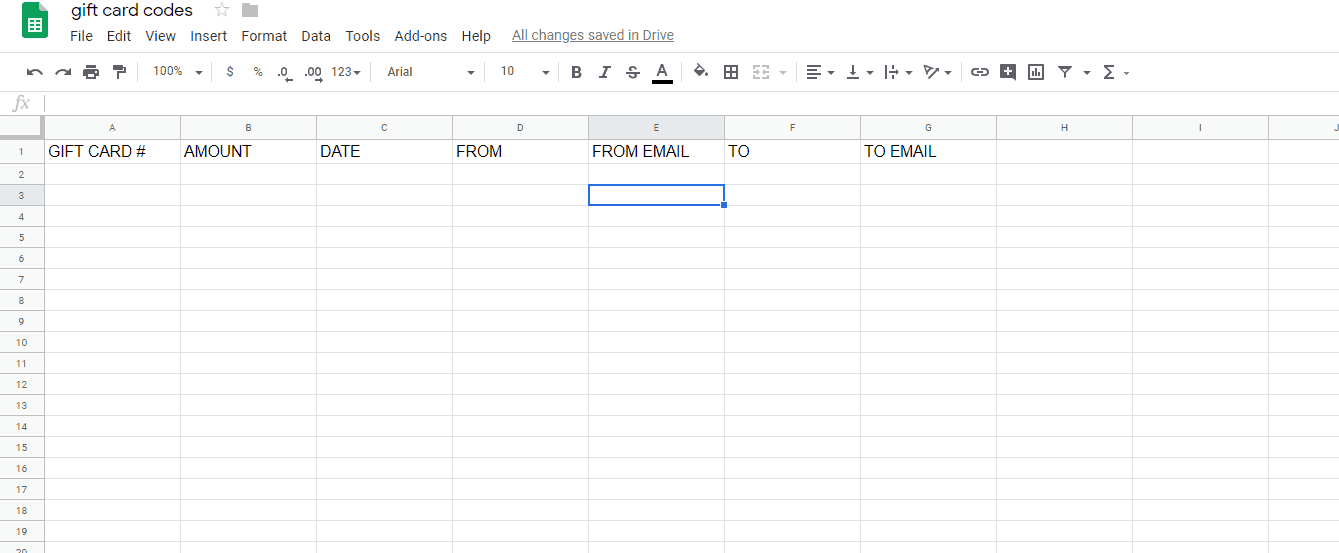
Next, you need to create a new spreadsheet in your google drive. It’s helpful to label the columns of the spreadsheet with the data you expect to receive from zapier.
Then back in zapier, we’ll need to select this newly created sheet, and add the data bits to each column
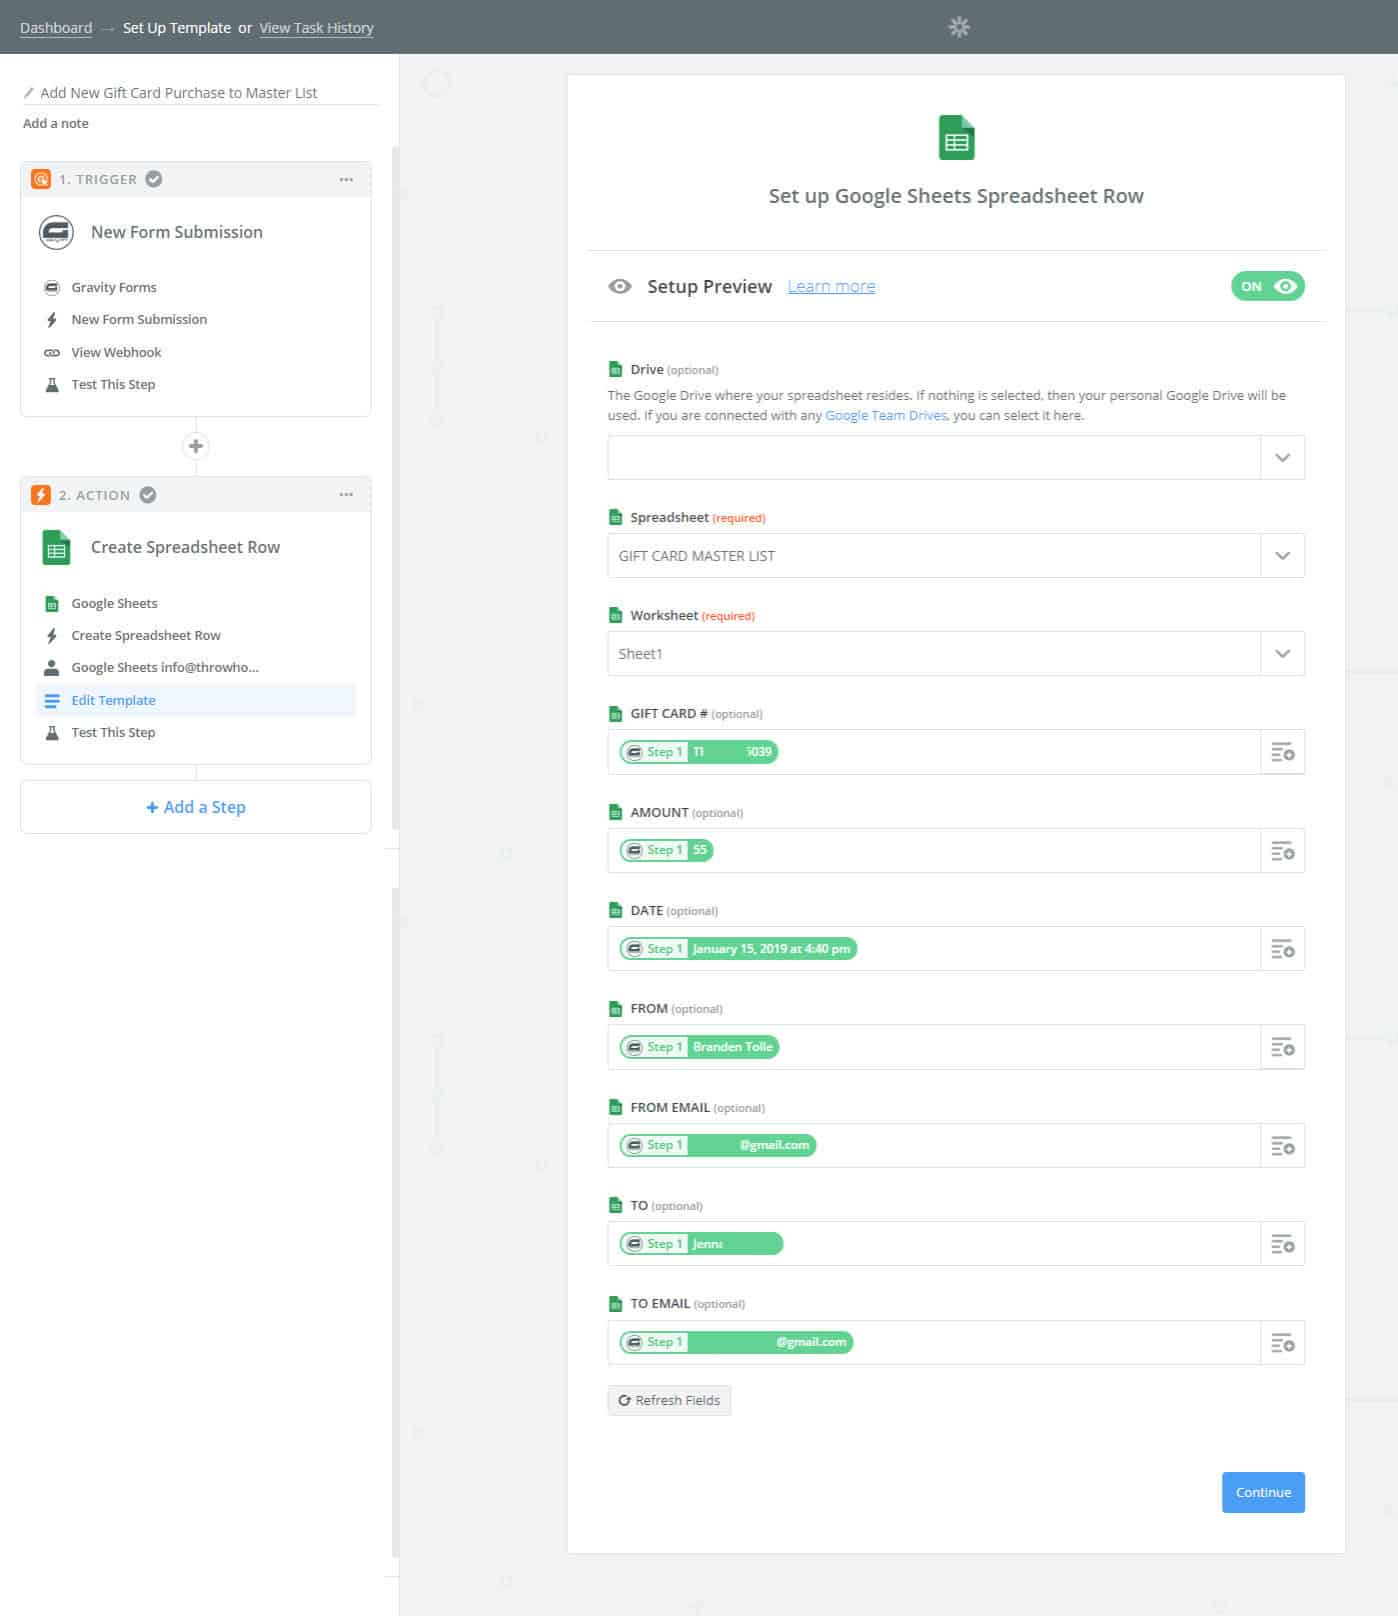
Once you’ve done that, it’s almost all set up. hit continue and give it a test. The data from your test submission should populate into your google sheet. Don’t forget to save your zap and turn it on. That’s it!
Now you have a spreadsheet to mange your gift cards. When a customer uses a gift card edit the value on the google sheet as needed.
A word of warning: don’t move the columns around in the spreadsheet. Zapier isn’t smart enough to know you did that and will simply continue using the same column. So if Zapier was populating to the 3rd column, it will still use the 3rd column, even if you moved that to column 5.
7. Make Woocommerce Coupons Automatically [optional]
If your site uses woocommerce, you can also easily make these gift cards into woocommerce coupons. To do so, just add this code to functions.php. be sure to update the field ID and form ID. This also applies to the hook. The 2 in gform_after_submission_2 is referencing the form ID. this must match your form ID or it won’t work.
//Create a woocommerce coupon programatically upon gift card checkout
add_action( 'gform_after_submission_2', 'after_submission', 10, 2 );
function after_submission( $entry ) {

    $coupon_code = rgar( $entry, '2' ); // sets coupon code var to input in field 2 (which is the coupon code field)
    $amount = rgar( $entry, '6' );  //sets amount var to input field 6 (which is the total)

$discount_type = 'fixed_cart'; // Type: fixed_cart, percent, fixed_product, percent_product

$coupon = array(
	'post_title' => $coupon_code,
	'post_content' => '',
	'post_status' => 'publish',
	'post_author' => 1,
	'post_type'		=> 'shop_coupon'
);

$new_coupon_id = wp_insert_post( $coupon );
// Add coupon meta
update_post_meta( $new_coupon_id, 'discount_type', $discount_type );
update_post_meta( $new_coupon_id, 'coupon_amount', $amount );
update_post_meta( $new_coupon_id, 'individual_use', 'yes' );
update_post_meta( $new_coupon_id, 'product_ids', '' );
update_post_meta( $new_coupon_id, 'exclude_product_ids', '' );
update_post_meta( $new_coupon_id, 'usage_limit', '1' );
update_post_meta( $new_coupon_id, 'expiry_date', '' );
update_post_meta( $new_coupon_id, 'apply_before_tax', 'yes' );
update_post_meta( $new_coupon_id, 'free_shipping', 'no' );
}