
How to Automatically and Instantly post your facebook live videos (or other facebook posts) to your wordpress website using facebook webhooks and Graph API with WordPress REST API
In this tutorial, you’ll learn how to make facebook and your wordpress website talk to each other. In my use case, I used this to instantly display the currently live video on my facebook page on the home page of one of my client’s websites.
The process, on a high level works like this:
- First, a Facebook page starts a live video.
- Then facebook sends a webhook to your website.
- The webhook tells your website that a live video has started, and what that live video’s facbook ID is.
- Your website receives that information via the WordPress API, and uses a custom function and the Facebook Graph API to then ask Facebook for more information about that particular video such as the embeddable html, and the height and width, or the permalink etc.
- Facebook responds with the information requested
- Your website gathers all that info, and creates a custom post with the video embedded.
All of this happens very quickly, so the result is that your facebook live video will be viewable on your website nearly the instant it goes live.
What’s a webhook
the first thing you need to understand is what a webhook is. You can easily google it, so I won’t spend a lot of time explaining it, but suffice to say that they are essentially HTTP requests sent to a particular URL when something of interest happens. They are typically GET or POST requests. It’s useful to understand the difference between those two, and I recommend you do some googling to understand it.
Part 1: Creating a Facebook Developers App
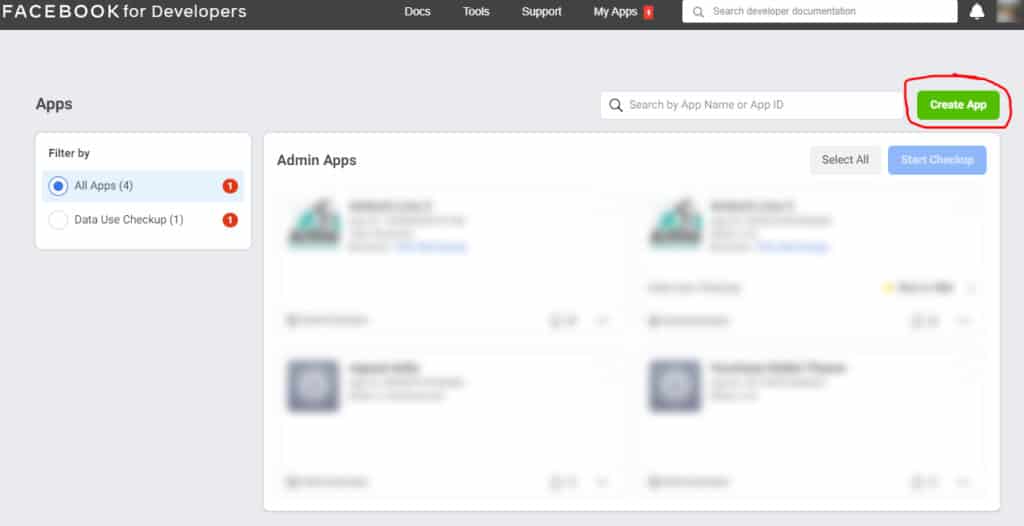
You’ll need to sign up for a facebook developers account and create an app on your dashboard here: https://developers.facebook.com/apps/
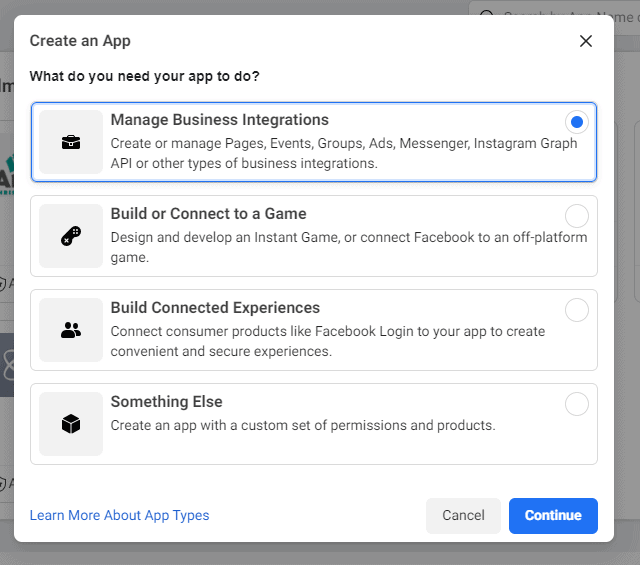
Then click the ‘Manage Business Integrations’ type
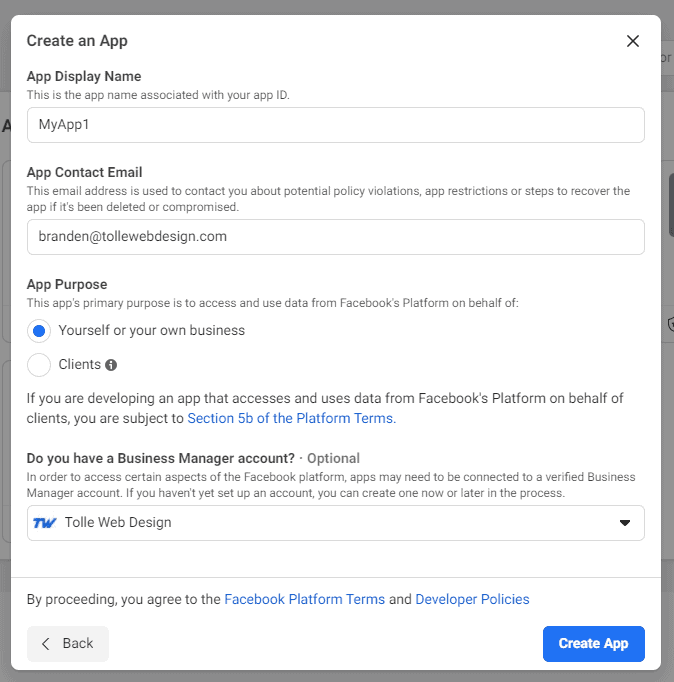
Then continue to fill out the information as you go. Note that it’ll probably be easier to get your app approved later if you already have a business account for your business. If you’ve been putting it off, now is a good time to do that
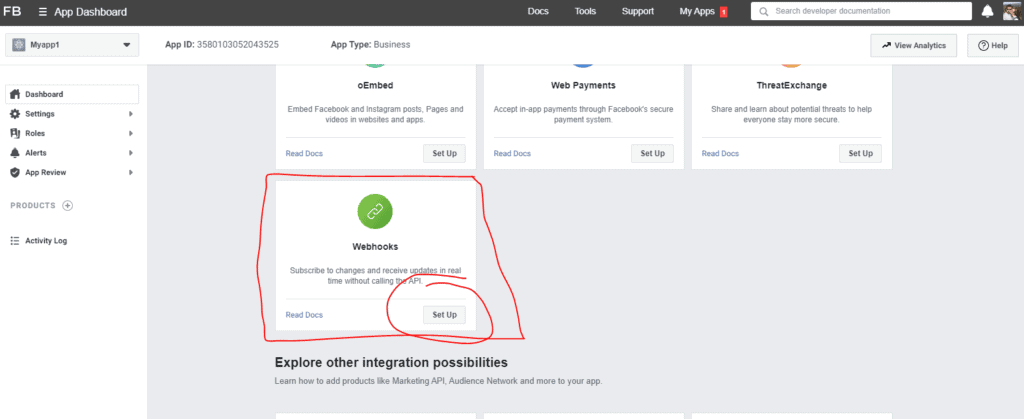
From your app’s dashboard, we’ll need to get the webhooks product hooked up. do that like this:
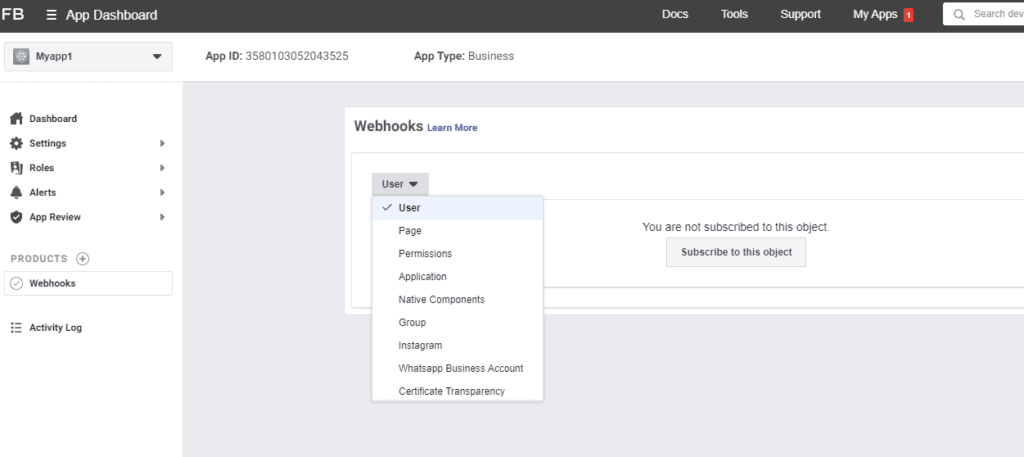
Here’s where you’ll want to choose whether or not to use this for a particular Facebook User, or Facebook Page. In my case, I want to automatically create a wordpress post whenever a live video is posted to a particular facebook page which I am an admin of, so I’m going to use “page” here. But you could do the same for “user” too I think.
It’s also worth noting that I don’t think you can use the webhook method for pages or users that you are not the admin of. It’s possible to query the graph api on a regular bases to check for new live videos, but that’s not what this tutorial is about.
Once you’ve selected ‘user’ or ‘page’ click on Subscribe to this Object. And you should see this:
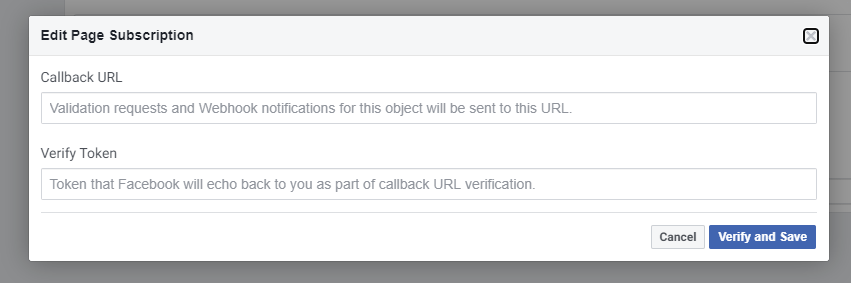
Facebook is asking where to send the webhook, and it espects that your webapp (in this case your wordpress) website will respond in a particular way. They spell it out in their documentation here: https://developers.facebook.com/docs/graph-api/webhooks/getting-started
Problem is, your website won’t respond in the right way or do anything with the webhook yet. So lets write some php magic to fix that problem. Keep this window open, becuase we’ll come back to it shortly in Part 5.
Part 2: Creating the WordPress API callback
This part of the tutorial follows the basic example found in this YouTube video by TechiePress. Essentially, WordPress has some built-in tools to receive webhooks and do stuff with them. This video is sort of an intro to that concept.
Lets start with some code, and I’ll explain later on what it does and how to modify it to suit your needs. Copy this code into your functions.php.
<?php


add_action( 'rest_api_init', 'bt_add_callback_url_endpoint' );

function bt_add_callback_url_endpoint(){
    register_rest_route(
        'namehere/v1/', // Namespace
        'receive-callback', // Endpoint
        array(
            'methods'  => array('GET','POST'),
            'callback' => 'twd_receive_callback'  //calls the function below
        )
    );
}


function twd_receive_callback( $request_data ) {

    //gets and echos facebooks 'hubchallenge' in order to be verified by facebook
    $queryparameters = $request_data->get_query_params();
    if (isset($queryparameters['hub_challenge'])) {
      $hubchallenge = $queryparameters['hub_challenge'];
      echo $hubchallenge;
    }

    //gets the data from the POST from the webhook coming from facebook
    $params = $request_data->get_params();  //gets all the POST information as an array
    $id     = $params['entry']['0']['changes']['0']['value']['id'];  //facebook object ID (the video ID)
    $status = $params['entry']['0']['changes']['0']['value']['status']; //live, unpublished, live_stopped, processing
    $time = $params['entry']['0']['time']; //time that the webhook fired
    $dayOfWeek = date("l", $time);

  //if the status was set 'live' meaning the video just went live, then continue with getting the details and posting to wordpress.
  if ($status == 'live'){

    //long-lasting-token for access to facebook graph API
    $token = 'CHANGEEEEEMEEEEEEEEEEEEEEEEEEEEEEEEEEEEEEEEEEEEEEEEEEEEEEEEEEEEEEEEEEEEEEEEEEEEE';


    $fburl =   'https://graph.facebook.com/' . $id . '?fields=video&access_token=' . $token;  //The url to send to facebook to use facebook graph api to get the video id


    //handles GET requests, returns response
    function httpGet($url){
    $ch = curl_init();
    curl_setopt($ch,CURLOPT_URL,$url);
    curl_setopt($ch,CURLOPT_RETURNTRANSFER,true);
    $output=curl_exec($ch);
    curl_close($ch);
    return $output;
    }

    $response = httpGet($fburl);  //the GET request to the facebook open graph, gets the video id


    $json_array=json_decode($response,true); //turns the json response from facebook into an array
    error_log(print_r($json_array,true));  //if you turn wordpress debug mode on, facebook's response will display there because of this line.


    $id = $json_array['video']['id'];  //the previous id was for the live stream, but facebook assigns ANOTHER id to the video itself. this video id has more data, and the stuff we need like height and width


    $fburl =   'https://graph.facebook.com/' . $id . '?fields=embed_html,format,title&access_token=' . $token;  //The url to send a get request for video info
    $response = httpGet($fburl);
    $json_array=json_decode($response,true); //turns the json response from facebook into an array

    error_log(print_r($json_array,true)); //if you turn wordpress debug mode on, facebook's response will display there because of this line.


    $embedhtml = $json_array['format']['2']['embed_html'];
    $height = $json_array['format']['2']['height']/2;
    $width = $json_array['format']['2']['width']/2;


    $posttype = 'post';  //you can change this to the slug for whatever custom post type you want to use
    $posttitle = 'My Live Video – ' . date("F j", $time);  //this is the title of the post we create
    $embedhtml = '<div style="max-width: ' . $width . 'px; max-height: ' . $height . 'px; margin: auto;">' . $embedhtml .  '</div>';  //this is the content of the post. you could add more content if needed


    // Gather post data.
    $my_post = array(
          'post_title'    => $posttitle,
          'post_content'  => $embedhtml,
          'post_status'   => 'publish',
          'post_author'   => 1,
          'post_type' => $posttype,
      );

      //error_log(print_r($my_post,true));

      // Insert the post into the database.
      kses_remove_filters();
      wp_insert_post($my_post);
      kses_init_filters();

}

    return;
}
The rest of this section will just be explaining what this code does. If you’re not interested in how this works, or customizing the code, just skip to part 3.
2.1 Explanation: Lines 5 through 16: Creating the callback
First, we’ll need to tell WordPress where we want to receive the webhook, and what HTTP methods it will be using. To do so, lines 5 through 16 use WordPress’s REST API to create an API URL where your website can receive webhooks. The URL is going to be https://youwebsite.com/wp-json/namehere/v1/receive-callback
You can change the Namespace and Endpoint in line 9 and 10 in the code above to modify the URL if you want.
2.2 Explanation: The Callback function
On line 22 you’ll see a function called twd_receive_callback. this function fires whenever your API URL is called. The function is always passed information from the HTTP request in the form of an object assigned to $request_data.
Side Note: We can use a number of methods on $request_data thanks to the WordPress API, and you can see them here: https://developer.wordpress.org/reference/classes/wp_rest_request/ In this tutorial, we use two of them get_query_params() and get_params(). get_query_params() gets all the URL parameters of the request, which is typical of GET request. get_params() does basically the same thing, but for POST requests.
2.3 Explanation: Getting our function verified by Facebook, and subscribing our app
Before facebook will send send your URL webhooks, they want to verify that the URL actually is legitimate and isn’t a waste of server resources. So they send a challenge request that looks something this:
GET https://www.your-clever-domain-name.com/webhooks?
  hub.mode=subscribe&
  hub.challenge=1158201444&
  hub.verify_token=meatyhamhock
Here’s their documentation on it: https://developers.facebook.com/docs/graph-api/webhooks/getting-started
We’ll need to echo back the hub.challenge value in order to be verified by facebook. That is what lines 25 through 29 do. Line 25 uses the built in WordPress method to get the query parameters. The ‘if’ statement checks to see if hub_challenge is set, and if it is we echo it back at Facebook. This is the response Facebook expects for verification requests, and it’s what will allow your API URL to be verified by facebook.
Technically all you need is these 4 lines lines and you can add your API URL to Facebook and verify and save it (what we were about to do at the end of step 1 of this article). You can do that now, but im going to save it for step 4, and continue explaining the code.
2.4 Explanation: Getting the relevant info from the webhook
When facebook sends a webhook to your API URL it will contain information about the event that happened. In the case of live videos, it contains the following useful information:
- The time the webhook fired (i.e. the time the event happened)
- The status of the video (i.e. the live video started, stopped, or is processing)
- The ID of the video: Facebook gives an ID to just about everything on facebook. This ID is actually the ID of the Live event (i think), and the
On line 25 we store that information using the built in WordPress method get_params() on the $request_data object we mentioned in 2.1. The information is stored in the form of an array. Here’s an example of what the array stored in $params() would look like:
Array
(
    [object] => page
    [entry] => Array
        (
            [0] => Array
                (
                    [id] => 265716147180247
                    [time] => 1606661085
                    [changes] => Array
                        (
                            [0] => Array
                                (
                                    [value] => Array
                                        (
                                            [id] => 1118904588528061
                                            [status] => live
                                        )

                                    [field] => live_videos
                                )

                        )

                )

        )

)
Sie Note Bonus Tip: if you turn on the wordpress debug log, you can record every webhook you receive, by inserting this snippet on line 37:
error_log(print_r($params,true));Side Note Advanced Bonus Tip: if you opt to create your own plugin rather than put this code in functions.php, you could create a log file which would log the webhooks without the need to use wordpress’s debug mode. To do that, add this code to line 37 (skip the first line):
<?php


    $file = WP_PLUGIN_DIR . '/bt-api-connect/incoming-webhooks.log';
    $logmessage = $id . " | " . $status . " | " . date("l jS \of F Y h:i:s A", $time) . PHP_EOL . print_r($params,true);
    file_put_contents($file,PHP_EOL . print_r($logmessage,true), FILE_APPEND);
Moving on…
Lines 33 through 36 stores all the useful information in variables. Now we can use those. In the end we want to get an embedable html code, but obvioulsy the information in the webhook isn’t sufficient for that so we need to ask facebook for more information through their Facebook Graph API. That all happens in the next step.
Part 3: The Long-Lasting Facebook Auth Token
We need to use Facebook graph API. The simplest way to do that is to create a long-lasting token and simply use GET requests to get the information from the Facebook Graph API.
You’ll need to create a long-lasting token. To do so, I used the method I found in this article by Maxwell Struever. You can check out his article, but here are the basic steps
1. Go to your apps settings page and find your app’s id, and secret
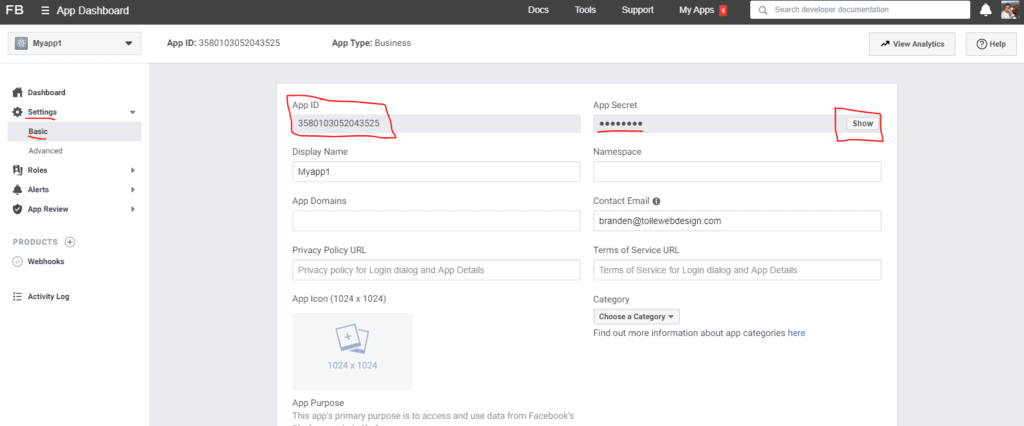
2. Go here: Graph API Explorer and generate a short-lived user token, be sure to add the permissions noted in the image below. Note, you may be asked at this point to submit the app for review if you aren’t already working with a live app. It’s ok, submit it for review. The required permissions/review should be automatically granted.

3. Type this URL into your browser (I did this with chrome). Replace the {things and brackets} with the values from step 1 and 2:
https://graph.facebook.com/oauth/access_token?grant_type=fb_exchange_token&client_id={app-id}&client_secret={app-secret}&fb_exchange_token={short-lived-user-access-token}
this will generate a long-lived user token.
In your browser, you should see a response that looks something like this:
{"access_token":"RHsM0FSZBFzayQsxIjZCzRHsM0FSZBFzayQsxIjZCzoRHsM0FSLN5yQsxIjZCzhZC4TAduLN5yQsxIjZCfsDNfCBizoRHsM0FSZBFzayQsxIjZCzhZC4TAduLN5fOdJt6VyQsxIjZCzhZC4TAduLN5BRZBeZB8XaKwdddd","token_type":"bearer","expires_in":5184000}This token is a long-lasting user token. but we want a long-lasting page token.
4. Type the following URL into your browser. Replace the {token} with the value from step 3. Note that {page-id} is just your page’s facebook url slug. for example, the page-id for https://facebook.com/tollewebdesign is tollewebdesign
https://graph.facebook.com/{page-id}?fields=access_token&access_token={long-lasting-user-access-token}
In your browser you should see a response that looks like this:
{
   "access_token": "9Fb9XaiXLjnv745FHJm8oZBaZAubr6xhZBtOFH4VCs7JRCAa7k5FHJm8oZBaZAubrFlHYFCS33FuASnbFT1MiX54FxsJMHhS8imu6GFrzRa7NnhGxAfBZBywDvPXI6mgeJDzQIdtIXTLdcqdsx9Fb9XaiXLjnv745FHJm8oZBaZAubr",
   "id": "189981584854687"
}
Note: if you get an error in the response above about the object not existing then you likley didn’t add the right permissions in the second step.
This is your long lasting page token! If you want, take the token and pop it into the token debug tool to see how long it will work for. You will need to refresh this token every 3 months or so by completing numbers 3 and 4 again. It’s possible to use facebook’s SDK tools so that you do not have to generate this code manually, but it just seemed like overkill for what I wanted to do, and I didn’t want to learn all about the Facebook SDK too. If you figure all that out and write a tutorial let me know hah.
Replace the CHANGEMEEEE part of the $token found in line 42 of my php code. Keep the single quotation marks.
Part 4: More Explanation
You can skip this part if you’re not interested, but this explanation should really help you to modify the code to suit your needs.
the if statement found in line 39 tells php to only fire if the $status is equal to ‘live’. This is important because facebook will send about 4 webhooks for every video you create. One right before it goes live, with a status of “unpublished”, another when it’s live with a status of “live”, another when it ends with a status of “live_stopped” and after with a status of “processing”
We only want to create a WordPress post when it first goes live, hence the if statement.
In order to retrieve the information from facebook, we’ll use a simple GET request to the $fburl you see in line 45.
Lines 50 through 58 actually handle the GET HTTP request, and line 60 stores the request in $response. The response is in json, so we use the json_decode() function to turn it into an array, and store that array in $json_array
Bonus Tip: This GET request only asks facebook for the ‘video’ field. but there is lots of other information you could ask for like permalink_url, embed_html, description, and more. You can see all the attributes you can get from this facebook video object in the Graph API Explorer. Just type in the live video’s ID and you can select attributed on the left (see image below).
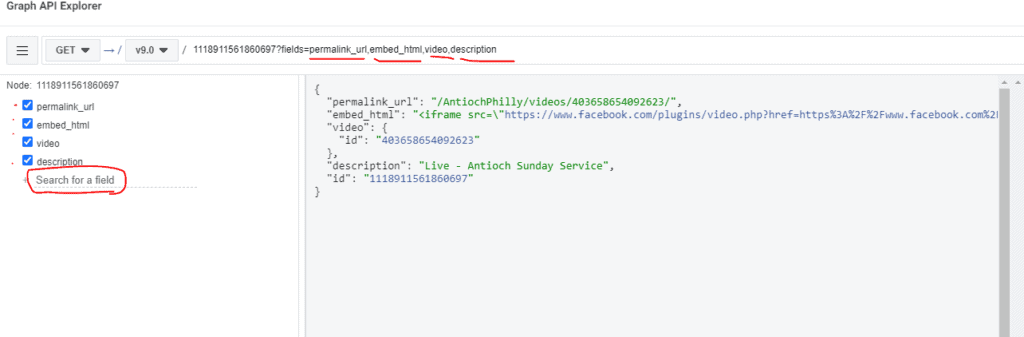
It’s sort of important to note that the Video ID is NOT THE SAME as the ID given by the webhook. You can see in the image above, that the webhook gave me ID 1118911561860697 but using the Graph API, i can see that the ID of the actual video is 403658654092623. This isn’t particularly important if you just want to take the embed HTML from here, but if you run another GET on the actual video ID you can get even more information. I do this to get the height and width of the video and create a div to make the video smaller, while preserving it’s proportions.
Because the video ID is different than the one we have from the webhook, I update $id to the proper one in line 69. Then we run the same GET request, but this time on the Video, which will allow us to call for the ‘format’ field, which gives us the height and width of the video, and that lets us know if it’s in landscape or portrait mode so we can format our div accordingly. The response from this request looks something like this:
{
  "format": [
    {
      "embed_html": "<iframe src=\"https://www.facebook.com/plugins/video.php?href=https%3A%2F%2Fwww.facebook.com%2FAntiochPhilly%2Fvideos%2F403658654092623%2F&width=130\" width=\"130\" height=\"73\" style=\"border:none;overflow:hidden\" scrolling=\"no\" frameborder=\"0\" allowfullscreen=\"true\" allow=\"autoplay; clipboard-write; encrypted-media; picture-in-picture; web-share\" allowFullScreen=\"true\"></iframe>",
      "filter": "130x130",
      "height": 73,
      "picture": "https://scontent-lga3-1.xx.fbcdn.net/v/t15.13418-10/s130x130/121943492_3707608159302940_2178201540915819399_n.jpg?_nc_cat=107&ccb=2&_nc_sid=ad6a45&_nc_ohc=pLMD2nB9cxgAX_-lPrw&_nc_ht=scontent-lga3-1.xx&oh=ef0153f94ba28cbd30c7111d872de1c0&oe=5FFC79FD",
      "width": 130
    },
    {
      "embed_html": "<iframe src=\"https://www.facebook.com/plugins/video.php?href=https%3A%2F%2Fwww.facebook.com%2FAntiochPhilly%2Fvideos%2F403658654092623%2F&width=480\" width=\"480\" height=\"270\" style=\"border:none;overflow:hidden\" scrolling=\"no\" frameborder=\"0\" allowfullscreen=\"true\" allow=\"autoplay; clipboard-write; encrypted-media; picture-in-picture; web-share\" allowFullScreen=\"true\"></iframe>",
      "filter": "480x480",
      "height": 270,
      "picture": "https://scontent-lga3-1.xx.fbcdn.net/v/t15.13418-10/s480x480/121943492_3707608159302940_2178201540915819399_n.jpg?_nc_cat=107&ccb=2&_nc_sid=ad6a45&_nc_ohc=pLMD2nB9cxgAX_-lPrw&_nc_ht=scontent-lga3-1.xx&oh=8c017a899670ce273c8fffe87e567760&oe=5FFF80AF",
      "width": 480
    },
    {
      "embed_html": "<iframe src=\"https://www.facebook.com/plugins/video.php?href=https%3A%2F%2Fwww.facebook.com%2FAntiochPhilly%2Fvideos%2F403658654092623%2F&width=720\" width=\"720\" height=\"405\" style=\"border:none;overflow:hidden\" scrolling=\"no\" frameborder=\"0\" allowfullscreen=\"true\" allow=\"autoplay; clipboard-write; encrypted-media; picture-in-picture; web-share\" allowFullScreen=\"true\"></iframe>",
      "filter": "720x720",
      "height": 405,
      "picture": "https://scontent-lga3-1.xx.fbcdn.net/v/t15.13418-10/s720x720/121943492_3707608159302940_2178201540915819399_n.jpg?_nc_cat=107&ccb=2&_nc_sid=ad6a45&_nc_ohc=pLMD2nB9cxgAX_-lPrw&_nc_ht=scontent-lga3-1.xx&oh=1b067eb09242723bbeaa25a6162773ad&oe=5FFE9F0F",
      "width": 720
    },
    {
      "embed_html": "<iframe src=\"https://www.facebook.com/plugins/video.php?href=https%3A%2F%2Fwww.facebook.com%2FAntiochPhilly%2Fvideos%2F403658654092623%2F&width=1920\" width=\"1920\" height=\"1080\" style=\"border:none;overflow:hidden\" scrolling=\"no\" frameborder=\"0\" allowfullscreen=\"true\" allow=\"autoplay; clipboard-write; encrypted-media; picture-in-picture; web-share\" allowFullScreen=\"true\"></iframe>",
      "filter": "native",
      "height": 1080,
      "picture": "https://scontent-lga3-1.xx.fbcdn.net/v/t15.13418-10/121943492_3707608159302940_2178201540915819399_n.jpg?_nc_cat=107&ccb=2&_nc_sid=ad6a45&_nc_ohc=pLMD2nB9cxgAX_-lPrw&_nc_ht=scontent-lga3-1.xx&oh=419f0e5ceb447efa0b29e79b3d160631&oe=5FFCE446",
      "width": 1920
    }
  ],
  "embed_html": "<iframe src=\"https://www.facebook.com/plugins/video.php?href=https%3A%2F%2Fwww.facebook.com%2FAntiochPhilly%2Fvideos%2F403658654092623%2F&width=1920\" width=\"1920\" height=\"1080\" style=\"border:none;overflow:hidden\" scrolling=\"no\" frameborder=\"0\" allowfullscreen=\"true\" allow=\"autoplay; clipboard-write; encrypted-media; picture-in-picture; web-share\" allowFullScreen=\"true\"></iframe>",
  "live_status": "live",
  "title": "Antioch Sunday Service Live",
  "id": "403658654092623"
}
There’s a lot more here, and three different video embeds. But the important parts I capture with $embedhtml, $height, and $width in lines 79 through 81. You can also get the thumbnails if you wanted. and there’s a bunch of other fields you can get too.
Bonus tip. you can also get the videos title and description if you add them to the field of the GET URL (test this with the graph api explorer), and then conditionally add taxonomies or change the post type depending on what’s in the description. this might be useful if you have different types of live streams, and in the description you title it a certain way every time like “Episode 5 of basket weaving” you could conditionally apply a category if ‘basket weaving’ is found in the description. The live stream box this client uses also applies a video “title” which is useful for knowing what comes from the box, and what comes from someone’s phone.
The rest of the function is just a standard implementation of the standard wordpress wp_insert_post() function. You could do a lot with this, like apply taxonomies, post to a specific post type, or add more post content. The possibilities are endless. It’s probably most useful here to point out that in line 86 you can change from post to the slug of whatever custom post type you want to use – if you want to use one at all. by default this will just create a regular wordpress post.
Part 5. Verify and subscribe
To start receiving webhooks from facebook we’ll need to verify the API url. We were about to do this at the end of Part 1. Let’s do it now:
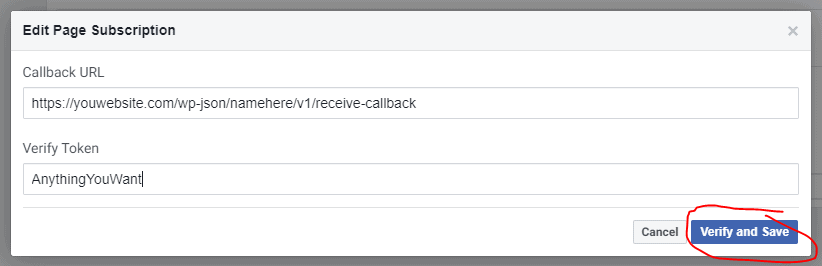
The token doesn’t actually matter for our implementation. According to their documentation you should verify the token, but you don’t actually have to, and they don’t send the token in the actual webhook requests so I don’t quite see the point.
Once you do that, you should see a screen like this:
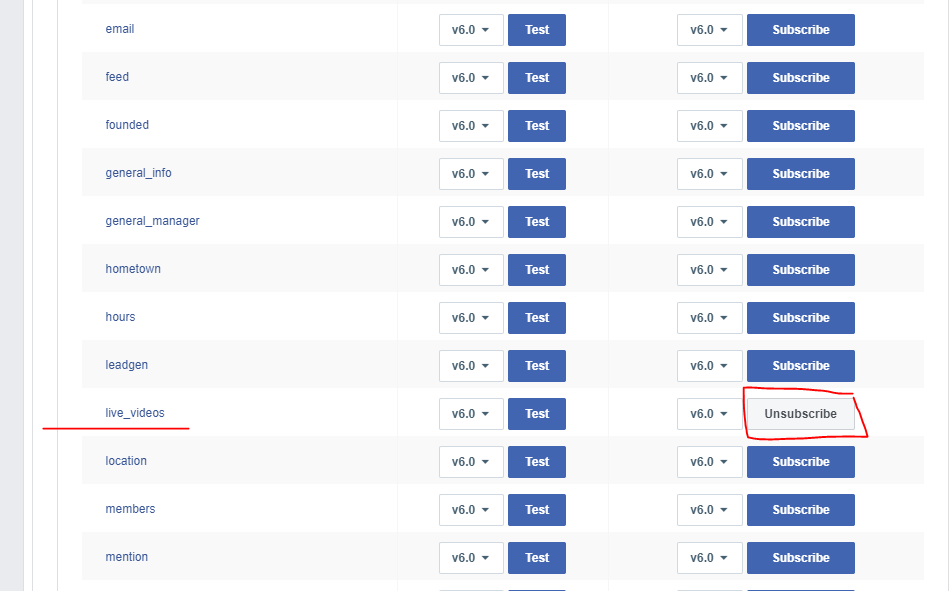
Each one of these lines represents something else you can ‘subscribe’ to. When you (your facebook app) is subscribed to one of these items, a webhook will be sent to your API URL every time one of these events occurs on a page which is subscribed to your app.
This is useful because it can be used to send a webhook whenever something of interest happens. So for example, as you can see I am subscribed to the “live_videos” item. This will send a webhook to my API URL whenever a live video is created, or ends on any facebook page which is subscribed to this app. This lets me make the WordPress post at the appropriate time, and with the right data. But as you can see you can do this for much more than just live videos. This can be used when all kinds of changes happen. Your recieve_callback function will need to be more complicated to handle more than one type of webhook though. That’s beyond the scope of this tutorial.
Part 6: Subscribe your page
Your app needs to be installed on your page in order for the app to send a webhook for that page. If you’re interested, here’s Facebook’s documentation on this.
1. Go download Postman for free, you’ll need it for this part.
2. Send a POST with Postman to:
https://graph.facebook.com/{page-id}/subscribed_apps?subscribed_fields=feed&access_token={long-lasting-page-access-token}
Note that {page-id} is just your page’s facebook url slug. for example, the page-id for https://facebook.com/tollewebdesign is tollewebdesign
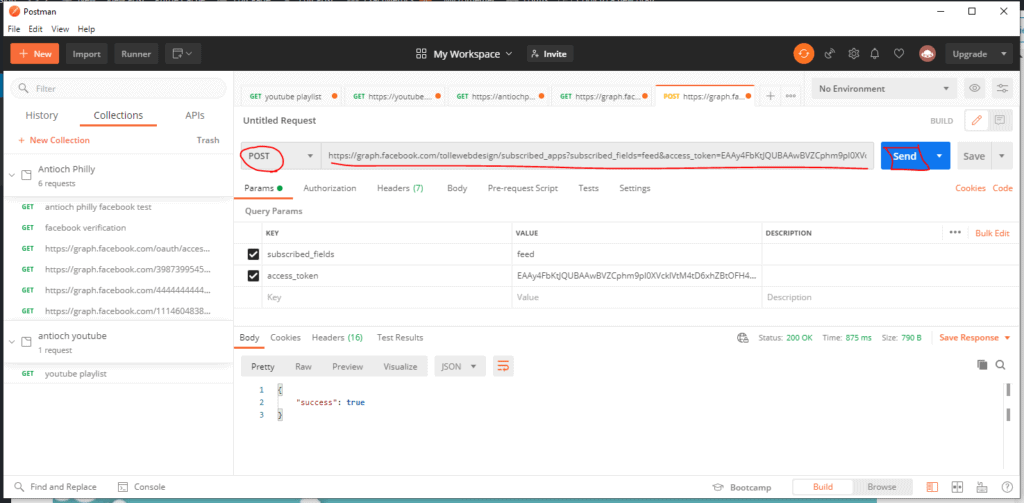
If you see “success: true” then it worked. If you want to check to make sure it worked, you can send a GET to “https://graph.facebook.com/{page-id}/subscribed_apps&access_token={page-access-token} and it should show the name of your app in response. Bonus points for doing it inside Postman. it’s a really useful tool to get familiar with.
Now whenever a live video is created on your page, facebook will send a webhook to your website, and your custom function will use the Graph API to get embeddable information and create a post.
Part 7: Display the latest video on your home page
In my implementation, I wanted the latest live video to show up on the home page as soon as it went live, and stay there embedded after it stopped, until the next live video, when it would be replaced. To do this I did this:
1. I used a custom post type. I added some conditional logic to the code to know when a live video of interest was being posted, and modified line 86 to my custom post type slug. You probably don’t need conditional logic if you just want to post every live video that the page produces.
2. I created the home page of this website in BeaverBuilder, and I created a row like the one below:
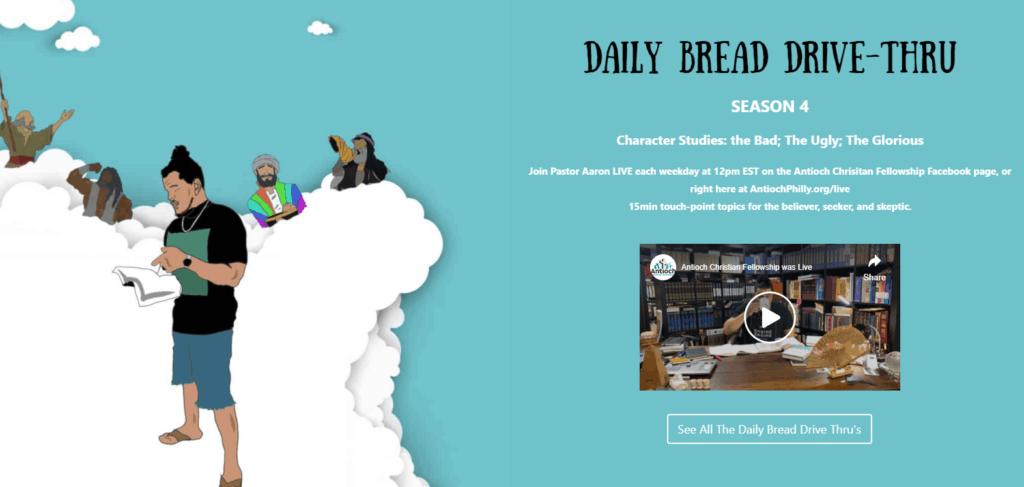
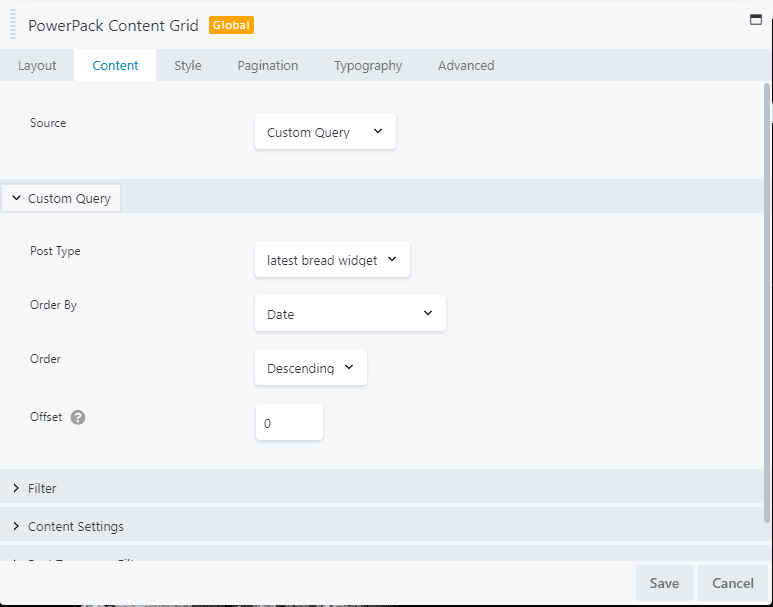
The video you see is the one that is the latest live video. It is replaced by a new live video the moment the facebook page goes live. The video on the home page is actually just displaying the post content of the most recent post of my custom post type. There are a bunch of ways you can do this, but because the page was built with beaver builder it was easiest to use PowerPack’s Content Grid Module. The grid is just set to display 1 result, the most recent result of the custom post type I called “daily bread widget”.
The result works really well. If a live video is playing and a user visits the site, it has a red “live” icon and they can click to hear the sound. If the page is not live, they see the latest live video there.
Don’t have beaver builder or power pack?
Don’t worry, there are other plugins that will do this. For example if you use elementor, I believe Ultimate Addons has a similar module. There’s also this plugin which could work on it’s own: https://wordpress.org/plugins/content-views-query-and-display-post-page/ there are probably other plugins that do this too. Or you could be adventurous and look up how to create your own wordpress short code, and in that shortcode create a function to display the latest post. It shouldn’t be too hard, just search for ‘how to display the latest post of a custom post type in php with wordpress’.